
I’ve been on a crusade to upgrade my half dozen Raspberry Pi’s to the most recent Raspberry Pi OS version. It’s more of a pain to setup headless than it used to be. Here’s my notes on the process.
All this assumes you’ll be using either wifi or ethernet with your Raspberry Pi.
What to Download
Raspberry Pi OS Lite
Download one of the Raspberry Pi OS Lite images on the official downloads page. Only download the 64-bit version if your Raspberry Pi is compatible (e.g. Pi Zero W’s and Pi Zero v1.3’s don’t work with 64 bit).

You may need to decompress the OS image with xz.
If you don’t already have xz, you can install it via:
# Arch
sudo pacman -Sy xz

# Debian
sudo apt install xz-utils
Decompressing:
xz -d 2022-04-04-raspios-bullseye-armhf-lite.img.xz
Image Burning Software
I prefer balenaEtcher to actually burn the image.
Download balenaEtcher from the official site. Windows and OSX have their own installers. On linux, you can just unzip and run the AppImage.
unzip balena-etcher-electron-1.7.9-linux-x64.zip
./balenaEtcher-1.7.9-x64.AppImage
With Etcher and the Pi OS image at hand, insert a micro SD card and burn the image.
It’s not generally this fast.
Remember which device it is so you can mount it later;
for me, it’s /dev/sdf.
Etcher is usually able to guess pretty well which devices you probably want, but be careful not to pick the wrong one.
Mount the Micro SD Card
If your system automatically mounts devices, you can probably just unplug and replug the card after flashing. You’ll need to update the paths in the rest of this guide if you go with that.
You can use lsblk to look at the currently mounted devices, where they’re mounted, and other info.
This can help you narrow down which device or path you’re looking for.
I’m using /dev/sdf, as mentioned above.
To manually mount:
# Make the mount point
sudo mkdir -p /media/microsd/boot

# Mount the partition
sudo mount /dev/sdf1 /media/microsd/boot/
We’re only mounting boot because it’s the only partition we need.
Setup Wifi
This is only necessary if you aren’t using ethernet for your Pi.
Create a wpa_supplicant.conf file in the boot drive.
Use sudo and your favorite editor to create /media/microsd/boot/wpa_supplicant.conf:
country=US
ctrl_interface=DIR=/var/run/wpa_supplicant GROUP=netdev
update_config=1

network={
       ssid="YOUR WIFI'S NAME HERE"
       psk="YOUR WIFI'S PASSWORD HERE"
       key_mgmt=WPA-PSK
}
Update your network info and country as-needed.
Add a User
Since Bullseye, the default pi user is no longer available.
For Raspberry Pi OS desktop, it’ll force you to make a user on first boot;
with headless that’s not an option.
To setup a user that you can login with, we need to add one to boot/userconf.
Note the spots for your desired password and desired username.
sudo sh -c 'echo "YOUR-PASSWORD" | \
openssl passwd -6 -stdin | \
xargs -I {} echo "YOUR-USERNAME:{}" > /media/microsd/boot/userconf'
Enable SSH Access
sudo touch /media/microsd/boot/ssh
SSH Over USB Configuration (Optional)
Source: Getting WIFI and USB serial port to work on Pi0W
Open the command line config file /media/microsd/boot/cmdline.txt and add:
modules-load=dwc2,g_cdc after rootwait.
Append to the config file:
sudo sh -c 'echo "dtoverlay=dwc2,dr_mode=peripheral" >> /media/microsd/boot/config.txt'
The USB connection won’t work until the gadget service is running. After your first boot, you’ll need to enable login via the gadget serial port (covered below).
Unmount
sudo umount /media/microsd/boot
First Boot
Now you can remove the micro SD card from your system and place it in the Raspberry Pi. If you wanted to use ethernet, plug that in. Turn on the system and wait for it to boot.
SSH into the pi using the credentials you setup in userconf.
Most of the time you can use raspberrypi.local to access the Pi.
# Clear out any old host information
ssh-keygen -R raspberrypi.local

# Connect to the default hostname
ssh [email protected]
With a successful connection, we can run updates on the Pi, itself.
sudo apt update
sudo apt full-upgrade
And you can run through raspi-config.
sudo raspi-config
The configurations I always update are:
- System > Hostname
- Localisation > Locale
- Localisation > Timezone
Loading times have been cut out - locale takes awhile to generate.
After reboot, you should be in a pretty good state. Most people can stop here.
If you updated the hostname, you’ll need to use your-hostname.local instead of raspberrypi.local for the remainder of ssh commands.
Enable SSH Over USB Service (Optional)
If you configured SSH over USB, the connection won’t work until the gadget service is running. After your first boot, enable login via the gadget serial port on the Raspberry Pi:
sudo systemctl enable --now [email protected]
When you connect the Raspberry Pi over USB, usually there’s a specific USB port you have to use.

SSH Hardening and Uploading Keys (Optional)
Unless you really care about security, you can skip this. If you lose your key, you lose your access to the Pi’s SSH interface.
It’s best to avoid password authentication over SSH and opt for public key authentication, instead.
If you don’t have an existing key, you can generate one (on your local system) as follows:
# If you choose to enter a password, you'll be prompted for it on each connection
ssh-keygen -t rsa -b 4096 -C "your-email" -f ~/.ssh/your-key-name.pem
Uploading an SSH key to the Raspberry Pi:
ssh-copy-id -i ~/.ssh/your-key-name.pem [email protected]
Don’t be afraid to use ssh-copy-id -f to force it if ssh-copy-id thinks the key is already there.
Test that your key works:
ssh -i ~/.ssh/your-key-name.pem [email protected]
You should NOT be prompted for the Raspberry Pi’s password unless there’s a problem with the key setup. If you set an SSH key password, you will be prompted for that.
Only proceed if the key is working. It’s better to use password authentication than to lock yourself out.
If the key’s working, you can make SSH-ing easier by adding your Pi’s info to ~/.ssh/config:
Host your-hostname
  IdentityFile ~/.ssh/your-key-name.pem
  User your-username
  Hostname your-hostname.local
Now you should be able to connect just by running ssh your-hostname.
Basic Hardening
Open the sshd config with some terminal editor:
sudo nano /etc/ssh/sshd_config
Most of the settings we’re looking for are already in the sshd config; many of them are commented out. Here are the key settings I usually update/add:
AllowUsers YOUR-USERNAME
LoginGraceTime 1m
PermitRootLogin no
StrictModes yes
PasswordAuthentication no
PermitEmptyPasswords no
UsePAM no
Protocol 2
Now restart sshd on the Raspberry Pi to pick up the new settings.
sudo systemctl restart sshd
You should no longer be able to login to the Raspberry Pi using a password; the key you generated should be the only way to do it.

Debugging Issues With Setup
The Raspberry Pi gives a repeating LED blink sequence.
Check out the LED blink error codes for Raspberry Pi’s to help debug the issue.
For example, my Pi Zero W was giving 7 short blinks over and over; it couldn’t detect the kernel because I’d accidentally used the incompatible 64-bit version of Raspberry Pi OS Lite.
ssh: Could not resolve hostname: Name or service not known
1st check: Is your Raspberry Pi properly booted or is it exhibiting a blink sequence?
2nd check: Is your Raspberry Pi connected to your network?
It’s worth double checking your ethernet cable or the wpa_supplicant.conf file from earlier.
Scanning for the Raspberry Pi
If your Pi is booted and connected, your system may be unable to resolve raspberrypi.local.
You can use nmap to find it manually.
This will look for devices with port 22 open and provide the SSH version.
As of writing, Raspberry Pi OS should have Raspbian in the SSH version name, so it’s easy to filter on.
# Scan for open SSH ports
nmap 192.168.1.0/24 -p22 --open -sV | \
# Filter it down to 'Raspbian' results
grep Raspbian -B 4
Example output:
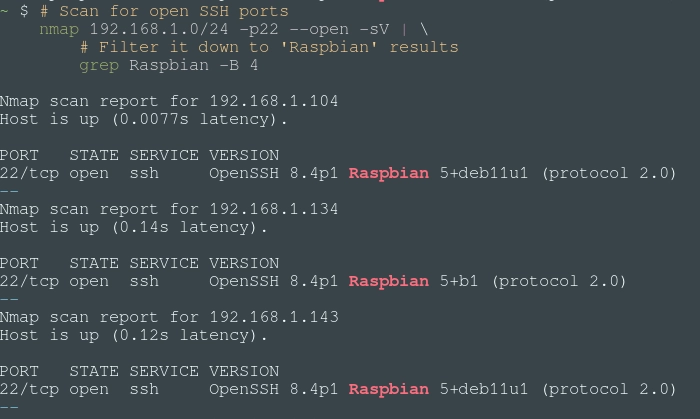
You probably won’t have this many results; ideally you’ll just have 1.
Try out these IP addresses with SSH.
In my case, I needed 192.168.1.134:
ssh [email protected]
You can use the IP address in place of the hostname.